


I received a wonderful surprise in my inbox this week from a client who I had done some work for last September. Much to my excitement, she had emailed me some 'After' photos!! I love to see photo updates from my clients, but these particular photos were exceptionally exciting. This time, this wasn't the usual full-service design project where I was involved from beginning to end, spending much of my time on site and seeing the progress along the way etc..,,,,,,in fact it was quite the opposite - this client came to me thru my e-design website, thedesignshop.ca. Which means I've never met this client in person or ever stepped foot in her house, although I feel like I have. So I was beyond thrilled to see this bathroom transformation thru the photos she sent me. (wait til you see the 'befores'!!)
thedesignshop.ca is a website I launched a little less than one year ago - its an affordable and accessible way to receive a comprehensive design plan, prepared by a professional Interior Designer then delivered right to your in-box. The entire process takes about 3 - 4 weeks and is suitable for those who live outside the Toronto area and/or those seeking design advice but are willing to do some of leg work themselves. In this case, the homeowner ordered a Bathroom Redesign for the main bathroom in her victorian rowhouse located in a historical neighborhood in Toronto. When she ordered the e-design service, she emailed me a site measure of her bathroom, photos, and all of her requirements. In return I asked her to complete detailed surveys relating to the house, her lifestyle, and her preferences and then she sent them all back to me along with a few inspiration photos of bathrooms or elements that she was drawn to. With all that information in hand,,,,,I was able to re-design her bathroom and deliver a comprehensive design plan to her complete with all the relevant information she would need to purchase all the products and hire a contractor to build her new bathroom. After sending her the completed e-design package last fall, I knew I had hit the target when she replied telling me how happy she was "when i opened up the attachment and immediately saw the moravian star fixture I knew you had captured my idea of a dream bathroom". Soon afterwards she sent me an update saying she had hired a contractor and they were looking forward to starting the reno in January. Aside from one question about the size of the vanity drawers (her contractor thought they would be too big?) I havn't heard from her again...............until this week. And - its all done!
But before I show you the after's,,,,you really need to see the before's to appreciate what a dramatic transformation this was.
The Before's......

Sink Vanity with hollywood lights

Tub/Shower enclosure with cedar clad walls

Wall to the left of the window with brick chimney wall and cedar cladding
The last time the bathroom was 'done' was in the early 80's, and with all that cedar cladding and the hollywood lights, the homeowner described this style as 'Sauna Chic'. It was the main bathroom in the house for her and her husband and two adult sons, their only other bathroom was a 2pc in the basement. The great features about the room were that it had good high ceilings and a wonderful big window with a gorgeous view of a leafy backyard garden.
The Inspiration.....

A collection of images that illustrate various elements and design details to be used as reference for the new bathroom design.

She loved the charming timeless character and warm colours of this traditional bathroom. I proposed either a panel moulding wainscott detail or a painted beadboard wainscott which would work equally as well.

She loved the understated and simple lines of this classically inspired bathroom with its contemporary styled plumbing fixtures and furniture style vanity. Also high on her wish list were clean lined vessel sinks and single lever faucets.

She loved all the traditional details here but wanted something warmer in colour for the walls.
The Design Plans....
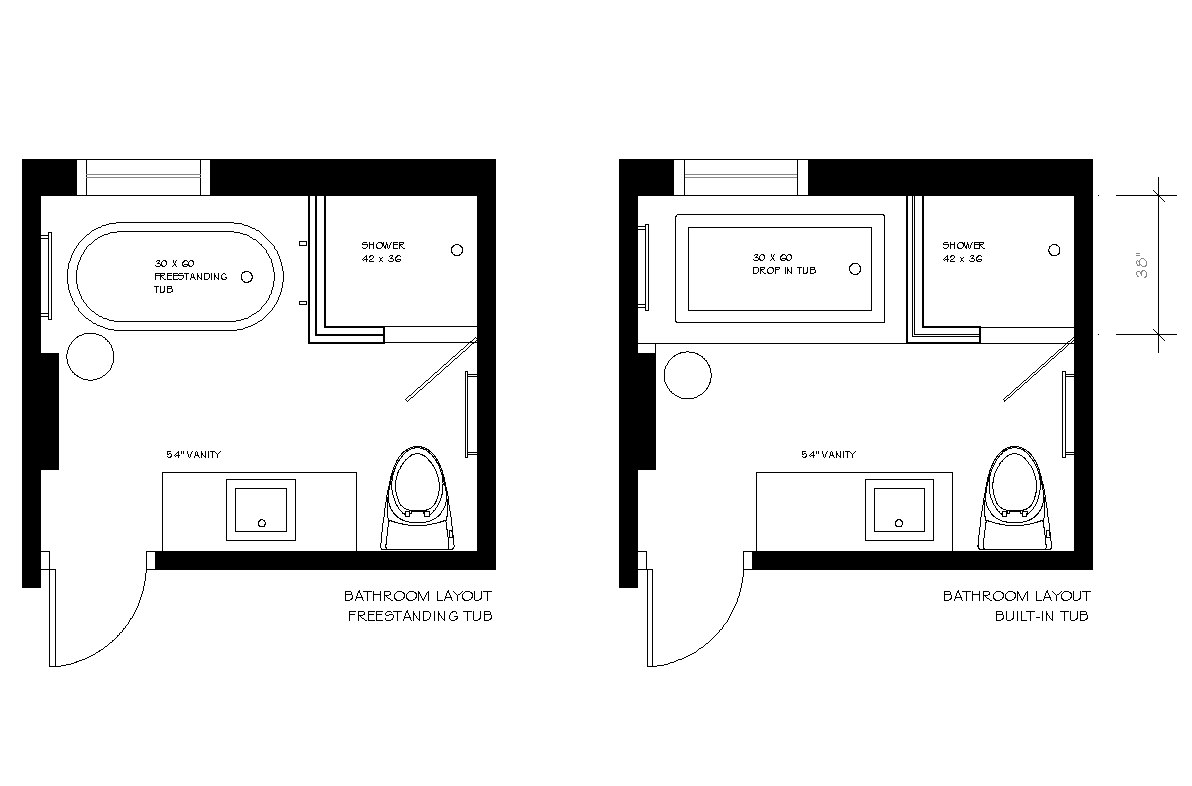
First I emailed her two preliminary layout options for incorporating a separate tub and shower which was the main objective, but the toilet and vanity locations remained the same. She decided to go with a drop-in style tub with a tub deck and skirted front. So the rest of the design plans were developed from there.

The final floor plan.

This is the Elevation at the window wall showing the new tub surround and seperate shower. The tub selection was key as we needed to find one that was low enough to be installed under the existing window and one that had simple clean lines. This new model from Duravit fit the bill perfectly!

This side elevation shows the half wall with glass between the tub and shower. The paneled wainscotting and crown moulding added that traditional character to the room.
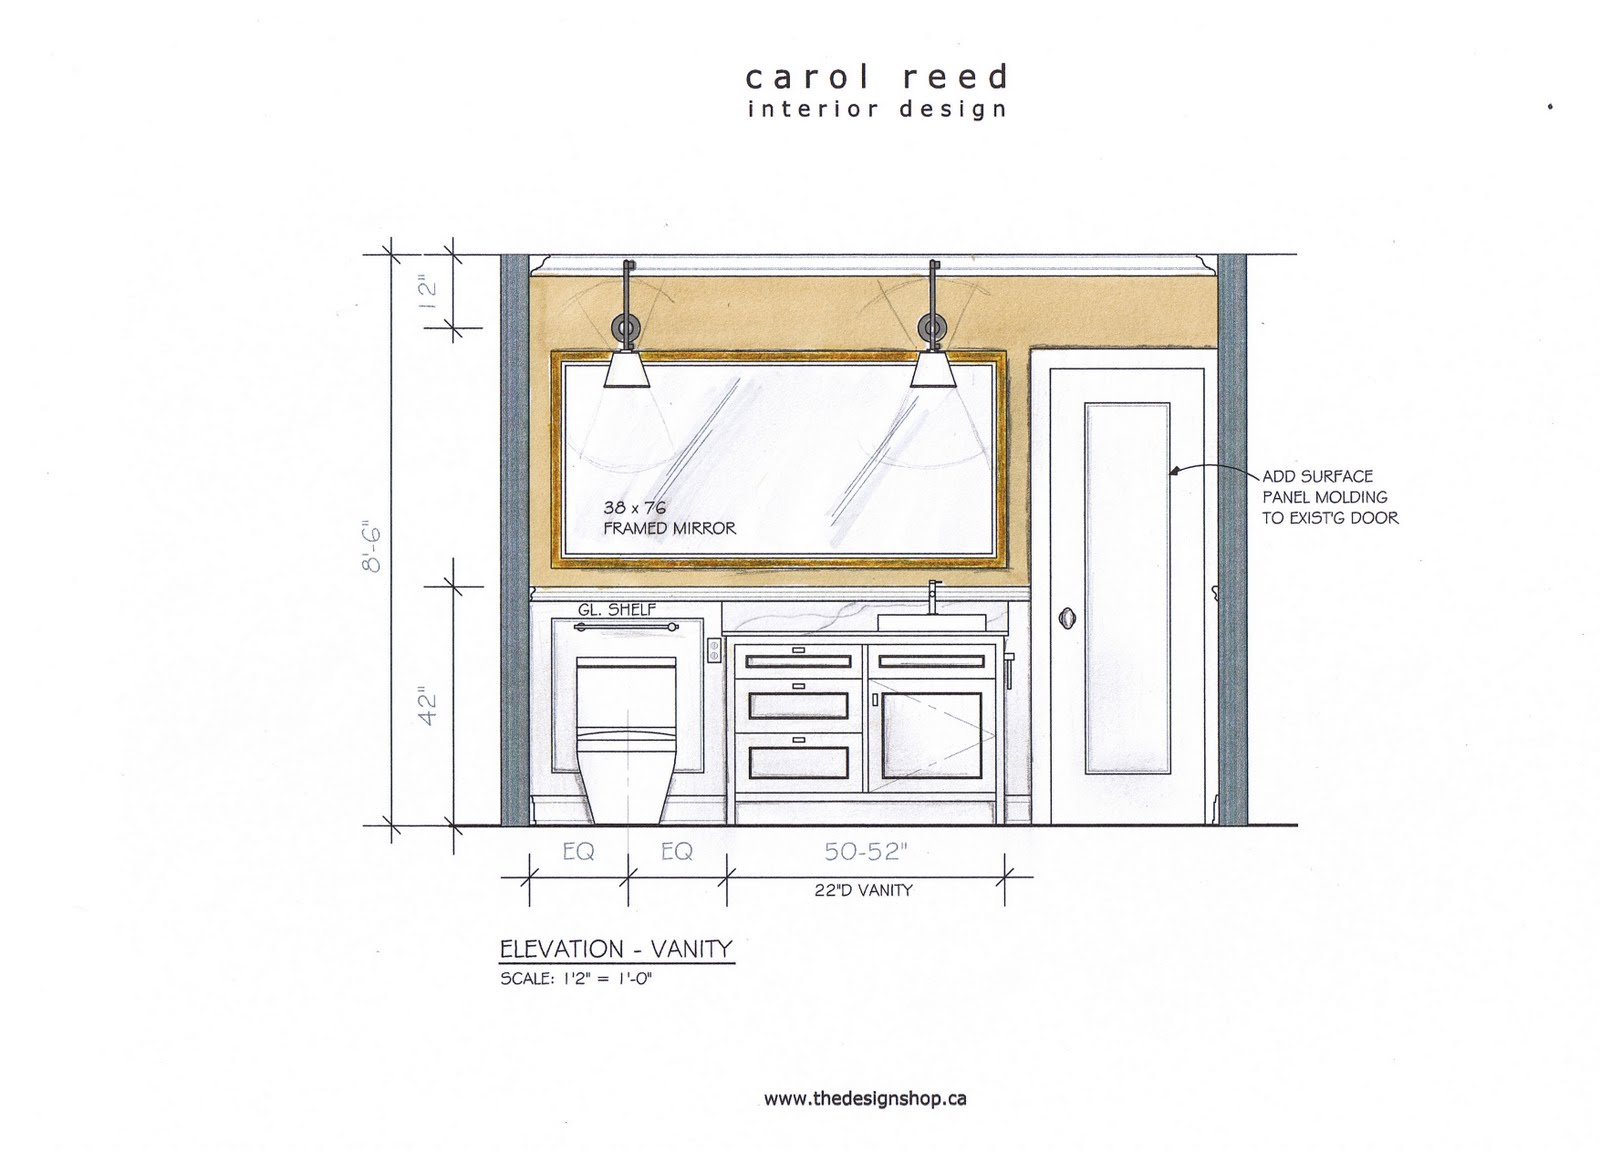
I had provided her with 3 options for the vanity wall, one option had a smaller mirror over a centre sink with scones on either side and a storage cabinet over the toilet, she had a hard time deciding as she really liked both, but in the end, she opted for this option with the large mirror and lighting above.
In addition to all the drawings above, I also provided her with a list and photos of all recommended plumbing fixtures, light fixtures, hardware, mouldings, tile, window treatments and accessory selections along with sources and approximate costs. You can see more images of this e-design package on thedesignshop.ca website sample gallery here.
The After's.....
The email I received from my client this week along with the 'after' photos was quite a surprise. I received a short note from her along with some photos. It was eloquent, and precise just like I imagine she is. "my bathroom has been complete for two weeks and I must say its the most beautiful bathroom I've ever seen. When the mirror was put up I had tears in my eyes..."


I proposed both a vessel style sink option and an undercounter mount,,,,,along with two faucet options of either a single lever or widespread. I was surprised to see she didn't go with the vessel style sink, but I think this looks great too!

I also provided several ligh fixture options. Often this decision is determined by what's available for when you need it, especially when you need two of them. You can see on the design board (2nd photo from top) that not everything illustrated there is seen in the after photos, however, the final choices made were from alternate options provided in the design package, so there is always flexibility of choice offered to the client.
Well what can I say but - so beautiful! Even without any professional styling or photography, the bathroom looks stunning. These photos were taken just the other day and the bathroom has only been complete for 2 weeks so I imagine she'll be adding a few more accessories or artwork in the future. I can't begin to describe how impressed I am with the results and congratulate her on doing such a stellar job!! To realize what this homeowner accomplished - implementing this project on her own with a set of plans and written instructions is inspiring. I think these images speak volumes to the importance and value of investing in a good design plan, but then again, this client is an Academic by profession so she was wise enough to recognize that! ; )
Since this house is located in Toronto, I'm making plans to visit in person before the end of next month so I can take some of my own after photos. I'm looking forward to meeting this client in person and she's looking foward to relaxing for a bit, pampering herself in her new bathroom and getting ready to start her next e-design renovation project......the kitchen!


Oh my Carol! What a dramatic transformation! It's amazing what can be achieved with an e-design plan. Beautiful work!
ReplyDeleteWhat a phenomenal transformation! I've seen e-designs before but rarely any actually executed this well. Your design was fantastic and it looks like the homeowner did a great job of bringing it to fruition. Kudos to you both!
ReplyDeleteThank you both so much! I too was impressed by how well my client (and her contractor!)implemented her design plan and how you can see even where she made her own design decisions (from options I provided to her) - she couldn't make a wrong choice. The space truly reflects her style as each of us would likely have ended up with slightly different results given the same set of options. And to think these 'After' photos are just candid shots taken by her with no professional styling or propping. As I would say,,,that's just beautiful everyday living!
ReplyDeleteAs usual Carol, I am always impressed by your presentation through finished product. You deserve your own Divine Dezign :) show!
ReplyDeleteI think these designs are not weird. Using the space of the bathroom is the main idea. I can see in every design the spaces are used highly. any complete bathroom renovations should be aware about this.
ReplyDeleteI have one small question about the wall between the shower and tub. The marble is 4.5" wide. Does that mean that wall is just plywood, backerboard and tile, with the marble on top? I love, love, love this shower/tub combo and need every inch. Thank you!! You do beautiful work!!
ReplyDeleteThank you Princess Purdy! Its a stud wall in this case with 3" framing (2.5 actual) with cement board, 3/8" tile each side,,,the slab sill is wider with approx .5" to .75" overhang each side of the wall. ~ C
ReplyDeleteThank you!!!! This could be a game changer and exactly what I need!! :)
ReplyDelete