Showing posts with label Stoney Lake Cottage. Show all posts

Thursday, April 30, 2015

Cottage Ensuite: Before & After


Cottage Ensuite - After  |  Carol Reed Interior Design

This client's cottage in Kawartha, Ontario, underwent a complete facelift that included updating 5 bathrooms a kitchen, a bar and a kitchenette.  (You can check out links to previous before and afters of this cottage at the end of this post).  One of the biggest issues to address when planning the updates was that not only did the bathroom finishes look dated, but the style of the bathrooms looked more suited to a suburban house rather than a lakeside cottage.  Dated or not there was a lot of quality there in custom built-ins and solid materials.  No question it was built with every comfort of an all season urban home, as its located in a premium area of high-end cottages.  The main objective in this 'gentle' reno was to work with what was there but infuse a more modern cottage style - while retaining a high quality level of finishes.  I felt this could be accomplished through a series of strategic changes as opposed to gutting everything and starting from scratch. 

For the master ensuite I recommended leaving the walk-in glass shower untouched except for replacing the faucet set from polished brass to brushed nickel and I also recommended leaving all the floor tile which was a neutral taupe ceramic.  This then put the focus of the facelift on the feature wall, a large double vanity that was the centre of attention when you entered the room.  We would also remove the wallpaper and all the wall mounted polished brass accessories leaving us with a very neutral base to work with and allow most of the budget to be directed where it would have the most impact.

Ensuite Vanity - Before
The Before:  The existing long double vanity was superb custom quality and was in excellent condition.  It sported a peachy/tan corian countertop, oval sinks, polished brass faucets (although it doesn't look brass in the photo, all the fixtures in the room were brass), painted knobs, a frameless wall to wall mirror and a dropped bulkhead with recessed pot lights. The vanity was made from solid woods, the framed cabinetry had inset flush door fronts with a bead detail and raised moulding.  There was loads of storage and counter space and each end of the vanity had countertop mounted cabinets that extended all the way to the ceiling - the only negative was it was all very dated looking and lacked that cottage style  the new owners were looking for.


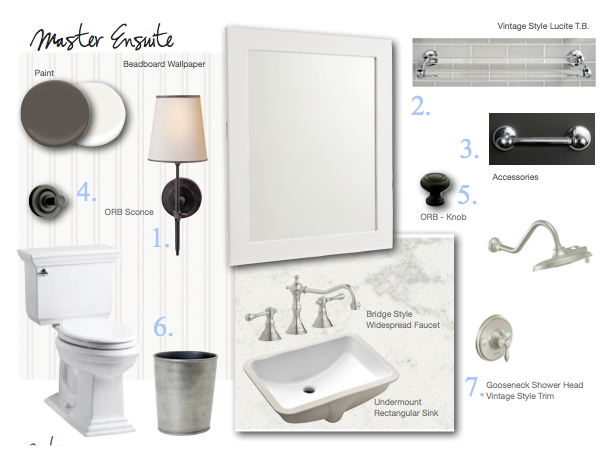
This is what I envisioned for the new finishes and fixtures, keeping in mind everything had to be readily available from the small local town nearby or available for quick delivery from an out of town source.


Cottage Ensuite - Finishes & Fixtures Concept  |  Carol Reed Interior Design

The starting point for the fixture replacements was the hardware.  The pine doors throughout the cottage were all updated with new distressed bronze lever handles that gave them a modern country look.  Continuing with this aesthetic, I introduced new bronze knobs and wall sconces to add contrast and vintage charm to the vanity wall.  For the plumbing fixtures we looked to the shower set first - because we were only replacing the trim not the rough-ins we had to work within the same mfg's product line in order for the new trim to be compatible.  The finish options were chrome or satin nickel, easy choice, the darker 'patina' of the satin nickel is a much better pairing with the bronze so satin nickel it was in a classic bridge style faucet and gooseneck shower head.

Ensuite Vanity - After
The After:  The entire vanity was refreshed with a new coat of paint in a crisp warm white, new low maintenance cararra look engineered quartz counters, new rectangular undermount sinks add a contemporary vibe, satin nickel bridge style faucets add a vintage country vibe as do the oil rubbed bronze hardware which also adds a sharp graphic contrast and ties in with the oil rubbed bronze lever handles on all the existing interior doors.  Other key updates to the vanity wall included; removing the bulkhead with pot lights, replacing the sheet mirror with a pair of framed mirrors above each sink,  installing a crown moulding and breadboard wallpaper on the wall between the upper cabinets and flanking the mirrors with new bronze wall sconces with parchment shades. Painting out the mirror frame, the beadboard paper and the crown moulding the same as the vanity unified the wall and cabinetry to read as one continuous built-in.


Ensuite Vanity - After
On this visit last Spring I was there to do a final walk-thru and make a list of recommended accessories and finishing touches, what would really finish off this room would be a graphic black and cream geometric patterned area carpet and a large woven towel hamper.  (Those should now be in place for this coming season. ) I'd also like to see a more rustic cache pot or planter with something less formal than orchids so we will work on that….


Ensuite - Before
The wallpaper and brass towel rods were removed and all the trim work was painted in the same white paint as the vanity.  


Ensuite Vanity - After

The walls received a new coat of paint in a dark brown/grey, similar but lighter shades of this found in the tile.  This dark colour really anchors the room and it neutralizes the pre-existing wall and floor tiles in a way that a light colour on the wall wouldn't have done.   The earthy colour also added a natural organic tone to the space and really accentuated the painted woodwork and all its charm.


Projects like this can be much more exciting to work on in ways that designing from scratch or all  new aren't, also evident in the way people are so drawn to Before & After story's.  Its literally a transformation before your eyes, making something out of nothing per say.  Taking a space that is uninspiring and working with it rather than ripping it all out - this is when vision and seeing potential really comes in to play and when the true value and power of design is realized.

For more Before and Afters of this cottage reno check out the following links below for older posts:


All Photos by:   Carol Reed


Tuesday, September 9, 2014

Before & After: Boathouse Facelift


Boathouse Kitchenette


As the first long weekend of summer arrived I was wrapping up a 2 day long visit to a clients summer cottage in Stoney Lake, Ontario. The trip involved bringing up some small accessories and taking note of remaining items needed to finish off various rooms. I made a big effort to get some progress photos while I was there. One of the last spaces I snapped before I retured to Toronto was the boathouse - sooo as this summer's final long weekend has just come and gone, I thought i’d revisit where I was on the first summer long weekend.   How has the time gone by so quickly?

Boathouse Kitchenette - Before

The interior of the boat house is just one big square room with a bathroom in one corner and a kitchenette in the other.  The entire interior was clad in knotty pine, the floor was covered in broadloom, the lighting and fixtures were dated,,,but with its soaring vaulted ceilings and lake views it had great potential for a simple refreshing makeover.  Loads of white paint, new pine plank flooring and a few new but vintage style fixtures were all this charming boathouse needed.  Its one of the lighter renovations I've worked on because it was purely cosmetic but it was a dramatic one, thanks to the magic of paint.  It was an easy decision to paint over all the wood, but it was a big job!


Boathouse kitchenette - After

I have to admit I cringe every time I hear people say that paint is such an easy and inexpensive or "quick fix" solution.  It suppose it can be compared to gutting a room and rebuilding or, if say you're doing only walls and those walls are 8' tall and you're painting a light colour over a light colour and the walls are in good shape - sure, you can paint an average size room in couple of hours and do it yourself.  I've done a LOT of painting in my time and I see professional paint quotes on a regular basis to know that properly painting an entire house is neither cheap, quick, or easy especially when it comes to painting ceilings, trim work, railings, windows, doors, stairwells and tall vaulted ceilings.  Factor in patching and repairing damaged walls and covering up dark colours or knotty pine, and you have a major job on your hands.  If you don't do the proper prep work, it will be a expensive disaster.  If you're an ambitious DIY'er say goodbye to many months worth of weekends or, call in the professionals.  So while I would describe this as a simple makeover - it did take a small team of trades people to make it happen.


The boathouse whitification in progress
We left almost all of the wood in the main cottage unpainted so I had carte blanche to paint over as much of the knotty pine as I wanted to in the Boathouse, and I intended to paint it all except the countertops.  Since this boat house only gets used in the summer months I wanted to give it a bright and airy summery vibe.  The painters had their work cut out for them, but I was ecstatic to see the progress and its transformation to white taking place...the white paint on the wood planks creates a great texture as all the grooves become shadow lines - so you still have the wonderful effect of wood panelled walls and plank ceiling.


See, you can still tell its wood even though its white everywhere!


The boathouse kitchenette - After

Unfortunately I can't seem to find a before picture of just the kitchenette (see before photo above) but here you can see how utterly charming it is now with a fresh coat of paint. I added a new white sink, gooseneck faucet, globe pendants and a wall shelf (not yet installed). The wood counters were perfect just the way they were and are a really great feature against all the white cabinets. The new pine flooring compliments all the white, looks rustic and is obviously much more practical than broadloom. 


The furniture is almost complete, all the main pieces are in but some occassional pieces and accessories still needed to be moved in.  We briefly contemplated white slipcovers but didn't end up using them here, this one was headed for a reading nook in the main cottage.


The best part about the transfomation is that the all white interior does a standout job of highlighting the incredible lake views. As there’s no heat source or insulation, the boathouse will get closed up soon but the main cottage gets used right thru the fall.   This was a such a departure from my usual reno projects but I hope you enjoyed this little peek at what was such a fun space to re-imagine.  Coming up in the next posts I’ll share some peeks of the front hall, the kitchen makeover and the master ensuite.


The view from the dock

Check out the boathouse bathroom before & after.


All Photos and room design by:  Carol Reed

Wednesday, August 20, 2014

Before & After: Cottage Guest Bath


At the risk of overloading my blog with traditional cottage style interiors I'm going to catch up on posting some before and after pics of the Stony Lake cottage project before the end of this summer.  I completed the cottage last year...and returned this spring to get some updated photos, but there are a lot of rooms!  You can check out my first post on the project here.  Most of the reno work involved the kitchens and bathrooms.  The cottage is relatively large and has 5 bathrooms in total.  You can see the boathouse bathroom before and after here,,,and today I'm posting the first of two bathrooms in the main cottage that I'd like to share.  The objective for all the bathrooms was to update the finishes and fixtures and keep the demolition and new construction to a minimum.  All the new materials and fittings would have to be readily available from the local building supply store (and nothing custom, nothing special order).   In addition to 2 ensuites the cottage has 2 hallway baths that are shared by several guest bedrooms. This before and after is the larger of the two hall bathrooms.

Bathroom Before
This hall bathroom's finishes and fixtures were dated but the vanity was excellent quality and in perfect condition - it would stay as would the entire walk-in shower except for new chrome trim pieces to replace polished brass.

The very first thing I set my sights on replacing was the floor and wall tile outside of the shower.  With its tan tile and peach paint and beige corian counter, it was looking a bit 80's suburban and not very Kawartha's lakefront cottage.  Because the wall tile in the shower was less prominent and in excellent condition, I opted to keep the shower as is and splurge on updating the vanity area.  Below is a concept board of all the new selections.  


In addition to new wide plank pine flooring (also throughout the cottage), the bathroom makeover included new wainscotting, mirror, lighting, toilet, sink, faucets, accessories and a new quartz countertop.  Switching out all the polished brass fittings for chrome was an obvious update and pairing the chrome with white beadboard wainscotting and deep navy blue paint would amp up the nautical cottage charm. 


I drew up the details for a new wainscotting and mirror treatment from stock materials which the contractor made all on site.  I chose a new drop in style sink because its a simpler install and a bit of cost savings versus an undermount, the rim profile adds to casual cottage vibe as does the new vintage style single lever chrome faucet (the shower received the same new chrome trim pieces).  Rectangular chrome knobs give the vanity a fresh update.  I found a set of flower print towels at the HomeSense in Peterborough which were perfect for this room as well as the yellow and white bathroom on the other side of the cottage.


A pair of vintage industrial style chrome scones from Restoration Hardware flank the mirror and illuminate the room in a soft complimentary glow.  Excuse the bad photo they were incredibly hard to photograph as the room has no natural daylight so they needed to be on.


All that's left on the to do list for this room is to find a couple of framed prints for the wall above the toilet, i'm on the hunt for either a pair of vintage nautical charts or fern botanicals.  : )
But nonetheless i'm told its been a busy space this summer accommodating a steady stream of my client's family and friends.  


Note: Please excuse the inconsistency of the colour in the above photos, the original files aren't like this,  the images only appear this way once uploaded into blogger and I havn't been able to figure out how to correct it or come up with a work around - never had this problem before.  The true colour of the wood vanity and flooring is somewhere between the light and dark versions above.


All photos and room design:  Carol Reed


Sunday, May 12, 2013

Stoney Lake Cottage: Bathroom #1 Progress


Here's a sneak peek  of one of several bathrooms in the Stonely Lake cottage project that are undergoing a light renovation.  The objective was to work with the existing elements as much as possible but give the entire bathroom a fresh new cottage style.   Its actually one of my favorite things to do - to explore the potential of existing space without completely gutting it and starting from scratch.  It is possible to transform an interior by implementing some straightforward changes.


Before - Existing Bathroom

The modifications for this bathroom involved replacing the ceramic tile floor with a wide plank knotty pine.  The existing solid pine vanity was great quality and in excellent condition but we replaced the synthetic countertop with new quartz counter, new hardware, added a new sink and faucet, and new lighting.  In addition to the new chrome fixtures the wall tile was removed and replaced with beadboard wainscotting with built-in mirror.  On the opposite wall to the sink I replaced the shiny brass towel bars with a row of chrome towel hooks.  A navy blue wall paint above the crisp white beadboard creates a classic cottage scheme.  To complete the bathroom we'll add colourful striped towels, a graphic area rug, and polished chrome and ribbed glass vanity accessories.


After - Bathroom in progress


This is just one of 4 bathroom remodels that are nearing completion in the cottage and getting ready for their first summer season.  I'm looking forwarding to sharing some after photos of the other spaces here in the coming months.


Sunday, April 14, 2013

Stoney Lake Cottage: Kitchen Progress


Cottage Kitchen - In Progress
This cottage kitchen is nearing the end of an extensive transformation.  When my clients purchased this new to them cottage late last summer, my first impression when I saw the photos was that it had great bones, and when I visited in person I especially loved its tall vaulted and cathedral wood ceilings.  It had several bathrooms and a large kitchen which were looking dated and more suburban in flavour perhaps than lakeside cottage. Without undergoing a complete gut of the interior, my challenge was to give the entire interior a complete update that would inject it with classic cottage charm that reflected this young family's modern lifestyle. The cottage would not be used in the winter so light, relaxed and summery vibe was in order.

Carpeting and narrow strip maple flooring (installed on a diagonal) would be the first to go.  Next up; new wide plank pine flooring, fresh wall paint, all new light fixtures, plumbing fixtures, hardware, countertops and appliances would complete the to do list.  But before we concentrated on all the new finishes and fittings for the kitchen, I recommended we rethink the layout.  The cabinetry was solid wood, great quality and in excellent condition but I saw a lot of potential for improvement and was convinced I could rework the layout using the existing cabinets but make it more functional for cooking and gathering.


Before - Kitchen Plan View

This cottage has no shortage of angles, while I do love the slopes of its dramatic cathedral and vaulted ceilings I wasn't crazy for the multi-angled kitchen island so this became my first target.  The island consisted of a cooktop, a prep sink, 3 different counter heights and despite its size, had seating for only 3, maybe 4.  There's nothing I dislike more in a kitchen than a cooktop in an island, especially where there's seating so my first goal was to find a new place for the range.  As you can see on the plan above, there wasn't a lot of wall space to work with.


After - Kitchen Plan View

Here's a view of the new kitchen floor plan I proposed.  The entire layout was created using all of the existing cabinets plus a new open section for the microwave.  Although there's still a few angled cabinets in the island I straightened out the island's orientation. The range now sits against a wall complete with a range hood. The fridge moved to the opposite wall, so now the fridge, sink and range are in a nice efficient configuration.  The island becomes a great pre-dinner gathering place (out of the way of the cooks) with lots of room for snacks, beverages, buffets, and seating for 6.  The family of 4 can also enjoy meals here dining style around the open end of the island. The new undercounted microwave frees up counter space in the work area.  There was much debate over the microwave vs second dishwasher vs wine fridge here. : )


Once the layout was nailed down, I selected an entirely new palette of finish materials and fixtures.   


Before - Kitchen Left Side 

I also did some editing by deleting the heavy wooden light valance above the kitchen windows, as well as the ruffled fabric valance.  This immediately brightened and simplified the space.  Next, the solid knotty pine wood cabinets would all get painted.


Before - Kitchen window and light valances.


Kitchen Left Side - In Progress

Fresh white walls and deep navy painted cabinets would compliment all the amber wood tones in the cottage and set the tone for a classic navy and white scheme throughout.  A new farm style sink and articulating antique nickel wall lights above the windows add vintage character.  The tall cabinet on the left will house the new stainless steel fridge.  The new counters and industrial pull-down faucet will be installed shortly....


Before - Right Side of Kitchen

  The old panelled fridge with black trim and counter top microwave were permanently removed as was the diagonally laid narrow strip maple flooring.


Moving the fridge to the opposite wall and shifting some base cabinets around made room for a new 36"wide range and exhaust hood.  A relocated glass door wall cabinet will work well beside the range for plates and bowls.  The existing solar shades, previously hidden behind the ruffled fabric valance now look perfectly simple and crisp set in the wood framed windows and provide light control from the afternoon sun.  See, I didn't get rid of everything. ; )


A pro style 6 burner range will be perfect for large family gatherings.  The entire cooking area gets a new full height stainless steel backsplash. New satin nickel cup pulls on the drawers complete the old cabinetry facelift.  New white and grey 'marble' quartz counter tops will wrap up to the underside of the window sill.


Before photos of the island, front view and back view.  A sea of wood.


The proposed new re-design of the island.
Initially the plans called for a second dishwasher in the island but later the homeowners opted to add a microwave here instead.  Amore recent change was the deletion of the raised countertop behind the sink, the island counter will now be all one level.


I completed all the design plans in December and the deconstruction started right away.  The contractor has been working non-stop all winter in effort to get the cottage ready for use starting May long weekend.  While all this reno work has been going on I've been working with the homeowners selecting all the new furnishings - no small task for this 7 bedroom, 4 bathroom cottage, plus boathouse!  Its been exciting to see it all coming together this past week, the rest of the fixtures and countertops will be arriving soon.  I'll be posting more updates and after photos in the coming weeks and months - I can't wait to share the dramatic bathroom transformations that have taken place not to mention the newly painted, all white (stunning!) boathouse.


All photos and drawings by:  Carol Reed Interior Design Inc.

Related Posts Plugin for WordPress, Blogger...